Get Started in GameDev in One Minute

Get Started
in Game Development
NOW!
This isn't a clickbait headline but a call to action!
A while back I made this one-minute tutorial video on how to get started in gamedev. To clarify, the tutorial is one-minute. I'm not claiming you can complete the tutorial in one minute or that you only need one minute to get into game dev.
The inspiration behind it was seeing people post on forums, Quora, Reddit, or wherever asking about getting started in game development, indie development, learning a game engine, or anything of the sort. In the questions a lot of them would say "I read this or that" so clearly they are spending time reading up on the subject.
It just kind of baffled me that people seem so interested in a subject and apparently spend tons of time reading up on it and asking questions everywhere but don't even dip a toe into the water!
So this was designed to get you to dip that toe in just one minute . . . or dive right in!
What is this?
Below is a one-minute video tutorial.
Below that is a lengthy, lengthy written explanation and instructions.
Why the contrast?
I hate watching videos that are too slow or starting a video not knowing what to expect. So I created a one-minute tutorial video hoping people are like "why not? It is only a minute!"
Hopefully, the video actually teaches people a few things on how to get started! But I'd assume it is more of a teaser than actually fulfilling a tutorial. I mean, it is only a minute.
I wanted to create a written tutorial to go along with it. I thought it might be pretty quick as well but when I started explaining parts I wanted to explain in detail in case someone gets stuck.
Watch the video and give it a try, but if you get stuck you can find help in the written section!
Oh, also at the end I uploaded the project I used for the tutorial so you can actually play it on this page, and I added more to it after the video. Then I have a section that explains a few different aspects of Construct in further detail if you are new to Construct and want to learn more!
YouTube Tutorial Video
GameDev Tutorial in one-minute. It goes fast!
TikTok Tutorial Video
I also posted on TikTok and the likes still trickle in now and then. Basically, the constant reminder that maybe I should make this post.
@loubagelcombo5How to get started making a platform video game in one minute. #indiedev #gamedev #construct3
♬ original sound - Lou Bagel
The change in aspect ratio isn't ideal for editing but it came out okay, I think.
Step-By-Step Instructions
Detailed instructions are found below but here is an overview of the steps:
- Go to Construct's Website
- Click "Launch Construct 3"
- Click "New Project"
- Name the project whatever you'd like and click create
- Add a sprite for the player
- Add Platform and Scroll To behaviors to player
- Add another sprite for solids (floor, wall, etc)
- Give sprite behavior of solid
- Design layout by duplicating and arranging the solid sprites
- Create sprite for enemy
- Duplicate enemy and move about layout to design level
- Add platform behavior to enemy but then uncheck "default controls" checkbox
- Duplicate solid sprite to create walls where you don't want enemies to walk off platforms
- Events: Enemy Movement
- Events: Death
Bonus
- Create sprite for "goal" of level (think like a Mario flag or an exit door)
- Add event for when player reaches this (see notes below)
Steps 1-4: Getting Setup
Steps 1-4 are pretty straightforward and upon completing you should have a new, blank project open in Construct.
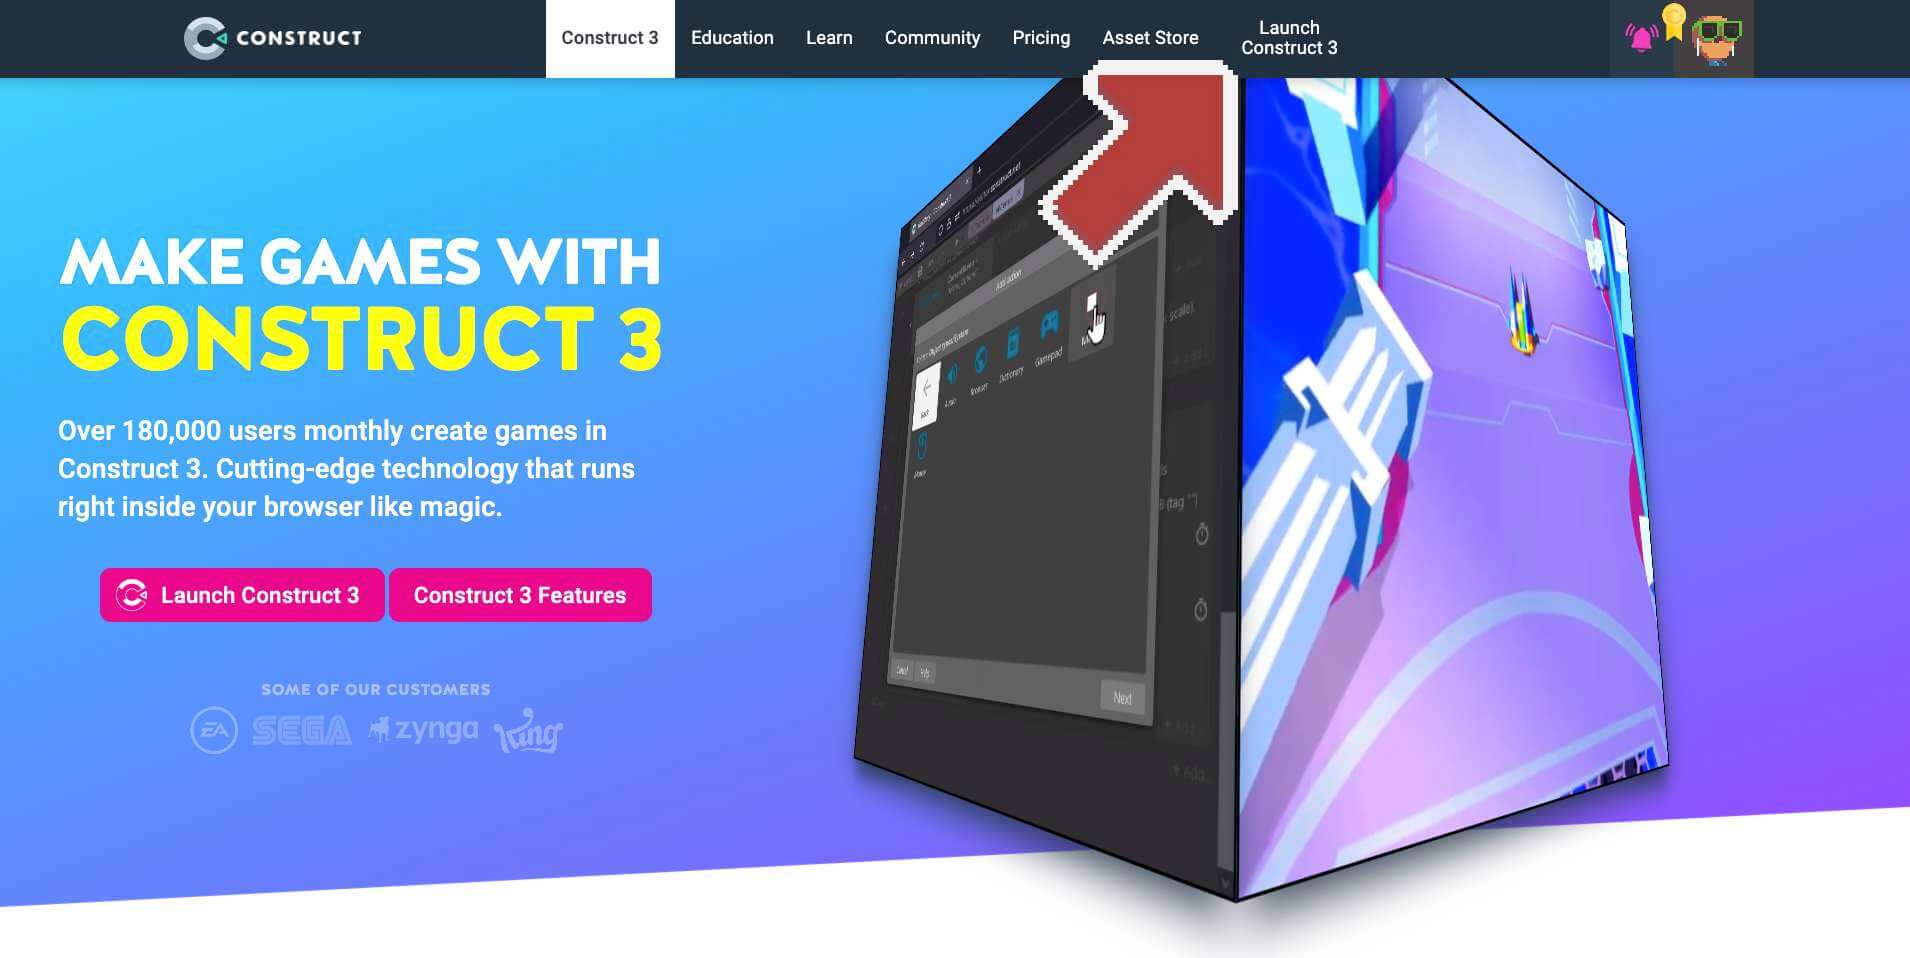
Note that Construct's homepage has changed slightly since I made the video. Now you can click "Launch Construct" straight from the top menu bar.
Step 4: Don't overthink any of those settings on the prompt to create a new project. The options here are changeable afterward and you don't need to change any of them for this simple tutorial.
Step 5: Adding Your First Sprite
New projects typically open to a blank "Layout Page", which is basically a visual editor, or you could think of it as a visual level designer. There is an event sheet as well which basically replaces coding in Construct.
More Information on Layout and Event Sheets
To add a new object simply double click anywhere on the layout page. This will bring up a popup menu:
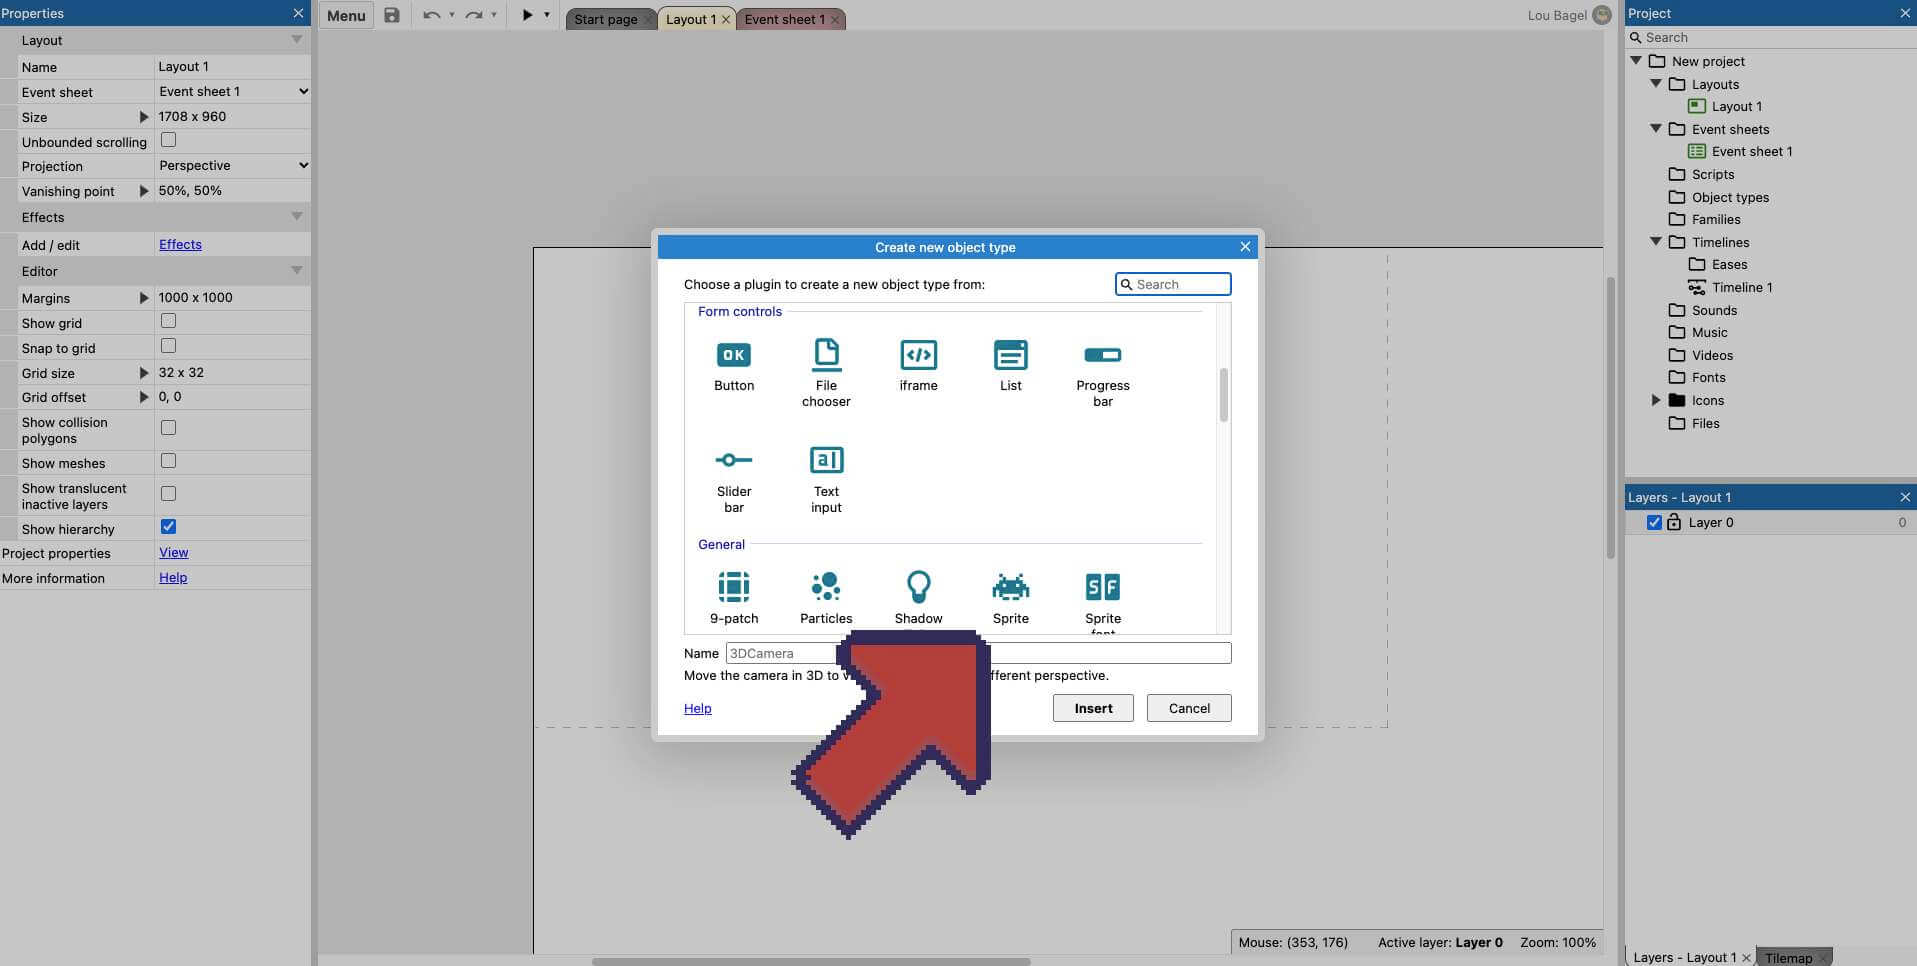
Find Sprite and click insert.
For now just assume everything you see in a game is a sprite - the player, enemies, projectiles, wall, floor, etc. Obviously, there are other types of objects that these can be but the sprite is the "basic building block" of games.
Step 6: Add Behaviors to Sprite
I like to think of Construct's behaviors like coding shortcuts (or for coders, maybe a re-usable module). The developers at Construct think about the most common features or mechanics that game developers have to implement and they create these "Behaviors" that you can add to an object and get this pre-packaged functionality to save you time.
So basically we can add some "Behaviors" to each object and save time coding these mechanics from scratch. Typically, on larger projects, you will have to have to do some work to get them working exactly the way you envision them working but they are great for quick prototyping or tutorials like this.
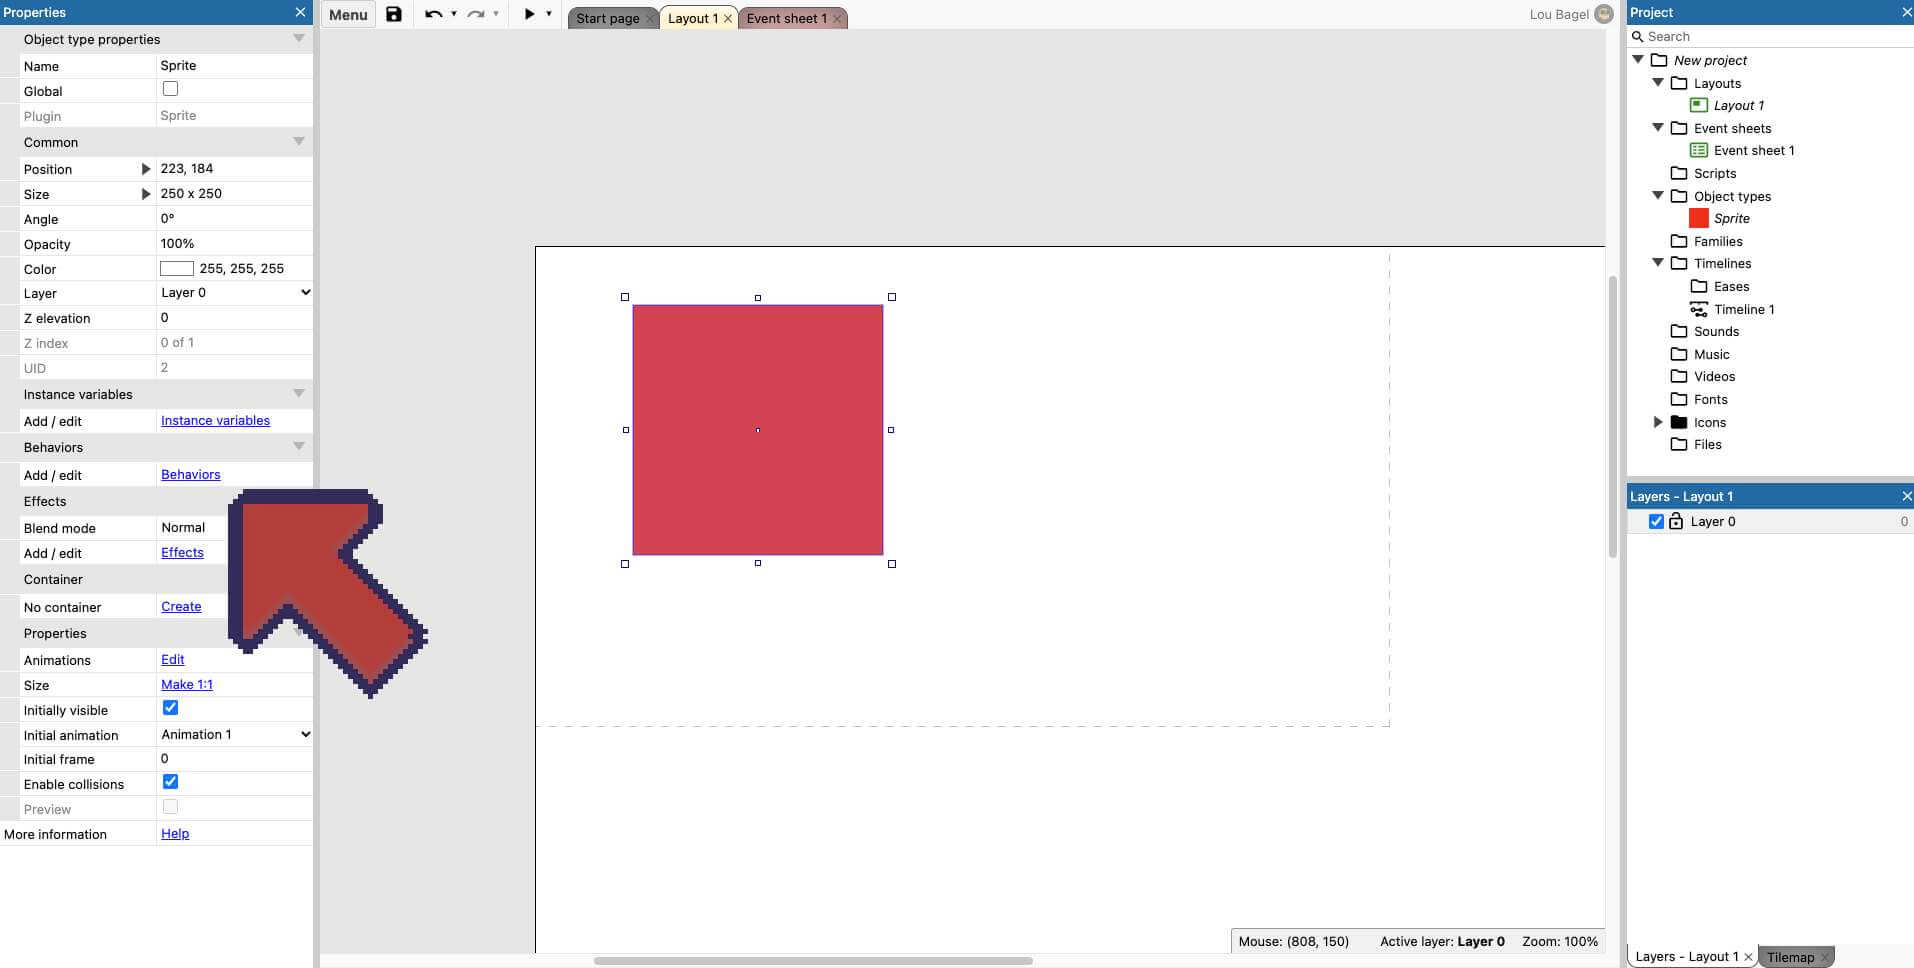
Select the Sprite you added to the project and click Behaviors on the left column.
Find the behaviors "Scroll To" and "Platform" from the list of behaviors and add them.
After adding them you should see settings for the behaviors added to the properties bar. A lot of these settings are self-explanatory so feel free to test out adjusting any of them. Sometimes you can make something fun and quirky just by changing a few in odd ways!
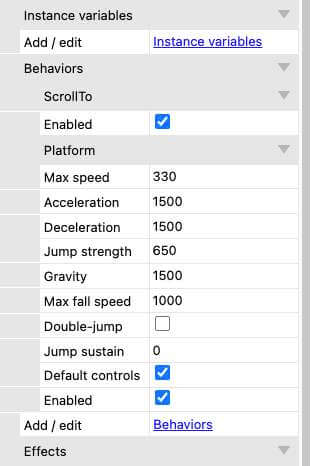
ScrollTo has only one setting - enabled or not - as the behavior is pretty simple. When enabled the camera will follow this sprite. Note that you would never want this enabled on more than one object or else you would have unexpected camera movement.
One note on the Platform behaviors - the "Default Controls" makes the arrow keys control this object, with left/right to move and up to jump. Later we will turn this off for the enemies and in larger projects you will typically turn this off as you will set up custom controls. But for this tutorial, we can keep it simple and use the arrow keys when testing.
Step 7-9: Designing the Layout using a Solid Object
These steps basically repeats the steps from above: add a new sprite and add behaviors.
This new sprite will be used to design the layout as it will act as the floor, walls, platforms, and even the ceiling if you want one.
But first why don't we demonstrate the fun part: Previewing!
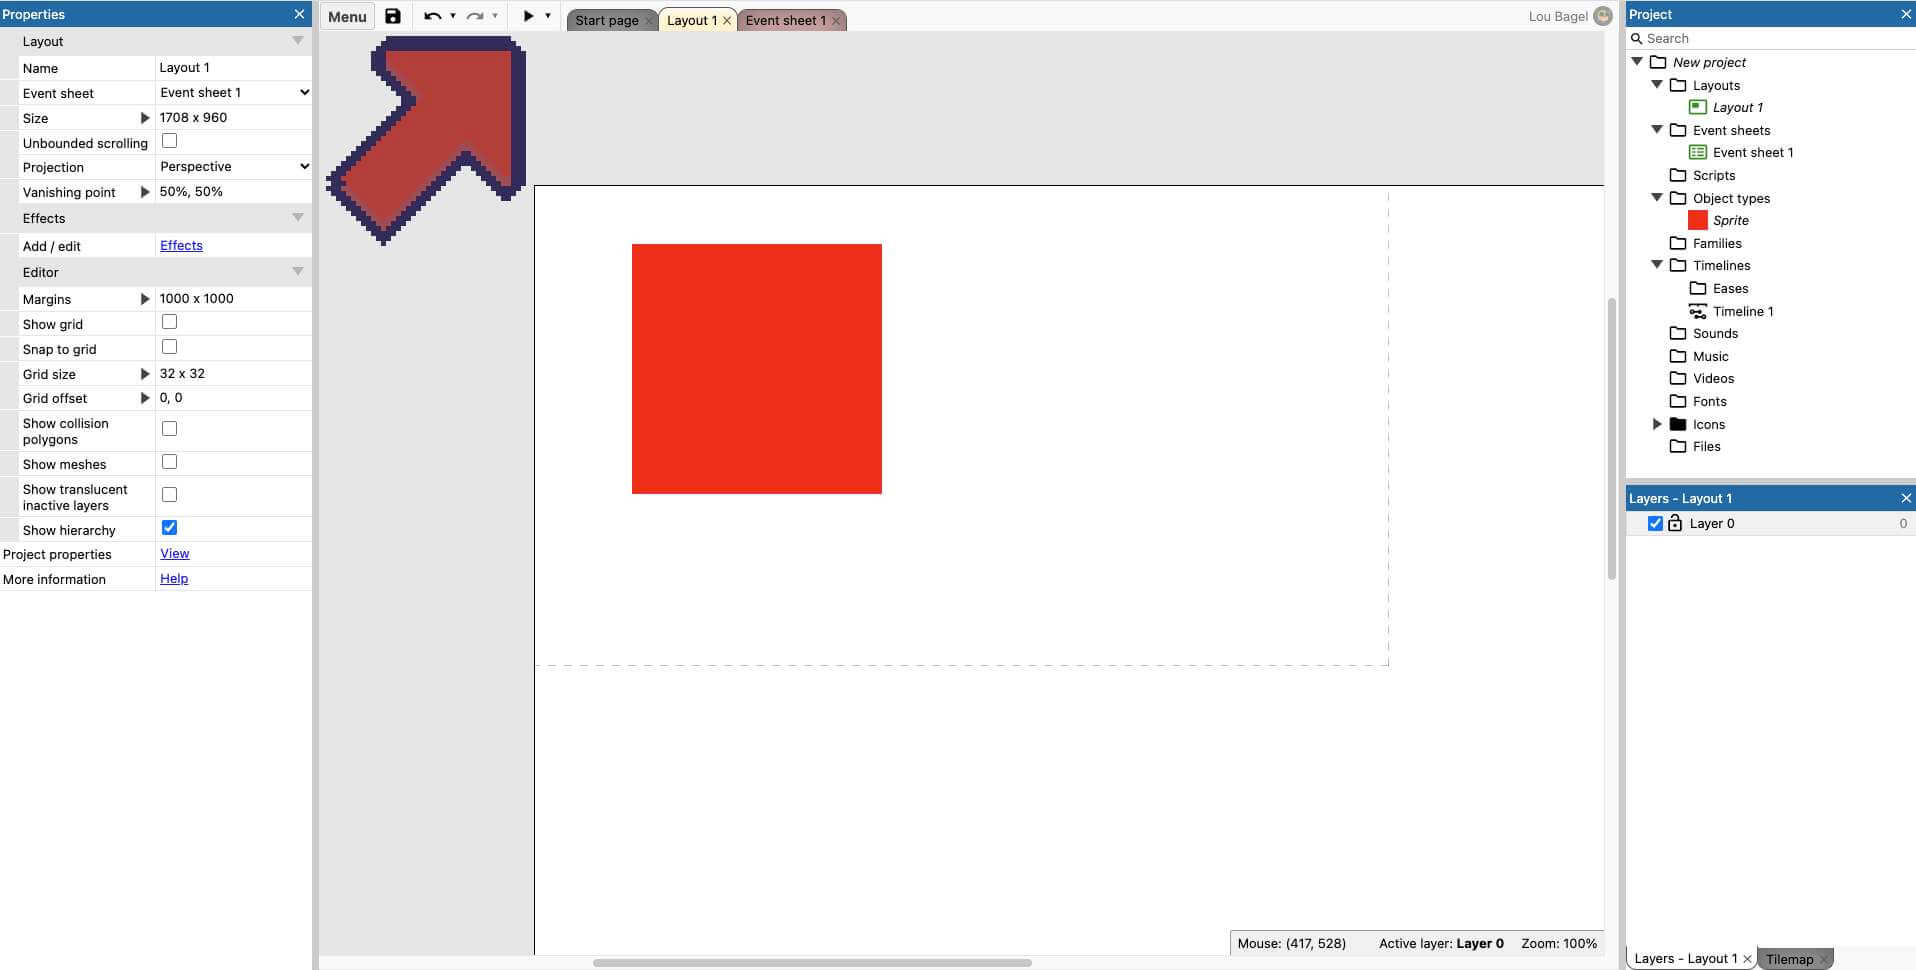
Click that little play button at the top of the screen!
This will open a new tab where you can actually see your project in action and play what you currently have! The speed of this previewer is a big reason why I fell in love with Construct!
If you preview the layout before adding any of your solid sprites you should see the player sprite simply fall off the screen. Having the platform behavior enabled causes the simulation of gravity and without any solid objects, there is nothing to land on.
After you add the new sprite and give it the solid behavior you should be able to land on it, move around, and jump off it like a typical platformer.
Important note: when making multiple instances of the solid sprite you don't want to "Add a new object" every time. This would mean you need to set it up every time and would be horrible for performance and maintainability. Nor do you want to "clone object type", which would cause the same result.

The above image is what you don't want to see - multiple object types for the same thing. You should just have one sprite for the player and one for the solid object. (Naming them helps your organization. Skipped that in the video due to time.)
You want to create a new "instance" of the object. A few different ways you can do this:
- Copy/Paste - either keyboard shortcut or right-click
- Hold cmd or alt (depending on OS) and drag object
- Drag the object type from the project bar (on the right) onto the layout
As you are creating new instances drag them around in different places and change dimensions (click on them then hover over the edges until you see the resize cursor) to start designing a layout. Preview it to test what you have - for example, to adjust platforms to make sure player can jump to reach it - but don't need to overdo it at this point as you can continue to adjust the layout design throughout the next steps as well.
Steps 10-13: Creating Enemies
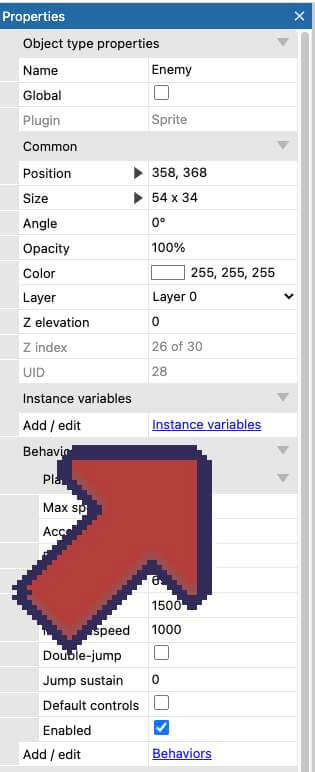
Now you will be repeating the process of creating a new object and adding behaviors for enemies. Obviously, this is a bit repetitive but at the same time shows how the sprite can be used for different purposes and almost simplifies it in a way.
Should be pretty straightforward but here are a few notes:
- After adding the platform behavior uncheck the "Default Controls" checkbox so they aren't controlled by the keyboard arrows . . . actually, give the layout a preview before unchecking to see what happens if you don't! GameDev is almost more fun when you don't do what you are supposed to do!
- We are adding instances of the solid sprite to the edges of platforms so enemies don't walk off them and fall into the pits. Of course, there are alternative solutions and many other ways you could want your enemies to behave. This is a very simple one though which makes it good for a first tutorial.
- When previewing the layout the enemies won't move at this stage. It is only logical as the player won't move by itself until you press the arrows. We will work on that next!
So now you should have your layout pretty much set up how you want and we can work on adding events to handle some other aspects. Reminder, while testing you can adjust the player's platform behavior settings, such as speed and jump height.
Step 14: Adding Enemy Movement
Okay, this section is really long. I don't think it is too complicated but it is long because I added a lot of pictures and explanations to guide you. I added a lot as I feel like this is where people can give up at.
When getting started with the event sheet it might not be as intuitive, or maybe as fun, to set up and play around with. Then when you set something up and it goes all wrong it is easy to give up as you probably don't understand what went wrong.
So this section we will make one mechanic, simple enemy movement, using 4 events. If you start getting the hang of it feel free to try and set it up on your own and just refer back to this if you get stuck.
Before we jump over to the event sheet we will need to do one more thing: add an instance variable to the enemy.
Click/Select an enemy instance or the enemy object on the right bar. Then look for the "Instance Variable" section on the properties bar, on the left. Let's add a boolean called "isWalkingLeft".
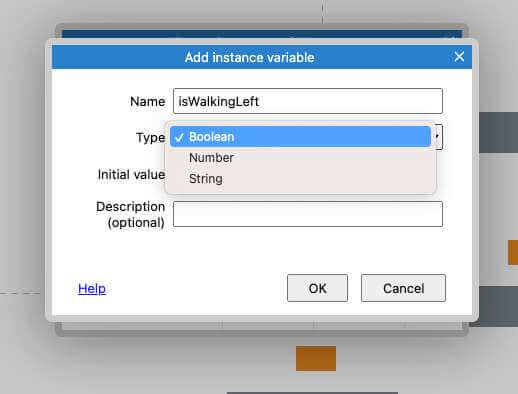
Why are we doing this? I think this is a trust me, or wait and see, moment. From experience I know to plan ahead by creating this but wouldn't expect a first timer to do this now. Also want to call out here that there are many different ways you could set this up. Other methods might not need an instance variable.
Now you are going to switch over to the Event Sheet, which should be blank at this point. Either double click anywhere or click "Add event" to pull up the "Add Condition" prompt:
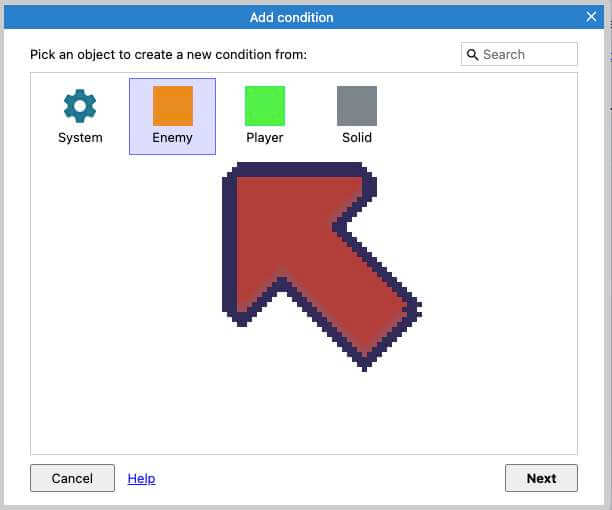
Here you will see an icon for every object in the project plus one for "System", which has some important ones. So this list will grow as your project grows.
Here we are setting the condition for this event to trigger. We will be moving the enemy to the left when the isMovingLeft boolean is true.
Look for the "Is boolean instance variable set" option and double click:
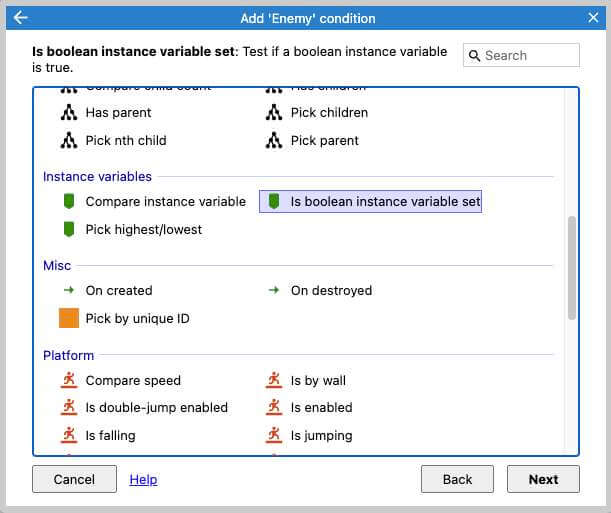
Note that there can be a lot of options and there is a search bar at the top right to filter. So in this case you could start typing boolean to find the option quickly, as sometimes I scroll up and down but keep missing what I'm looking for.
In the next prompt there should be no options to change. Click "Done" and you should have this:
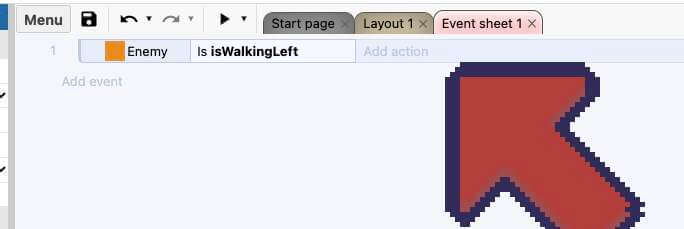
Now we have a condition set so this event will fire (aka happen) but there is no action, so nothing will be done. So click add action to open the add action box.
The first part will look the same as the condition and you will once again choose enemy. Now you will look for the option "Simulate Control".
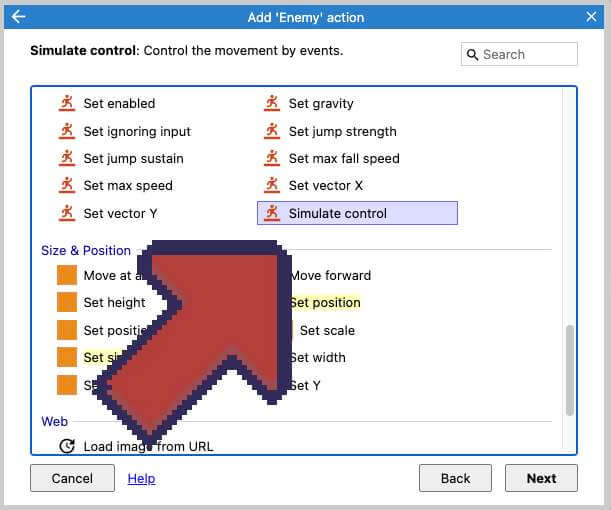
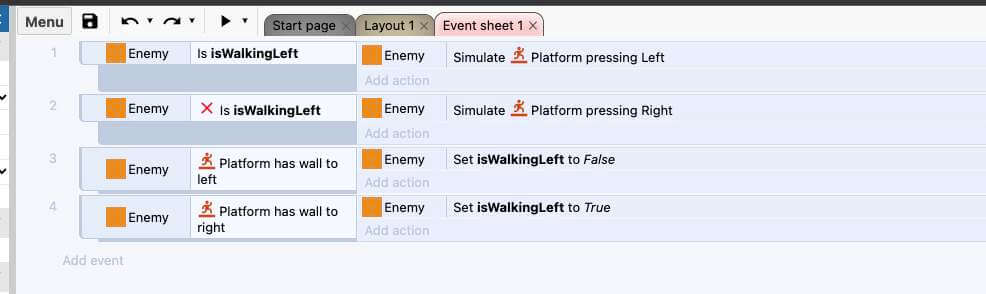
After choosing left from the next prompt your event sheet should look like this:

Obviously, we need to add in an event for the enemy to move to the right as well. Click on the entire event (make sure the entire row shows selected, not just the condition or action) and copy-paste.
Right-click on the second condition and select "invert".
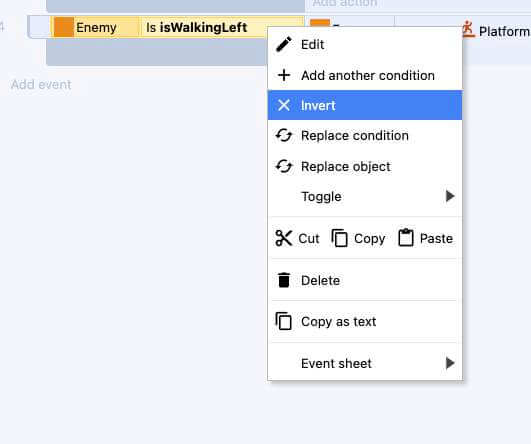
A boolean variable can only contain the value of true or false. This is when you created the first condition there were no options, such as "if variable is equal to".
The first event will fire when the isWalkingLeft boolean is true and the second one, now that you inverted it, will fire when the boolean is not true. Since those are the only two values a boolean can hold one will always fire.
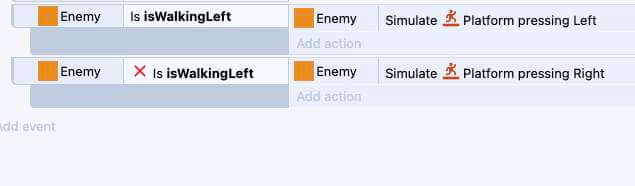
Now your event sheet should look like the above.
Now is actually a good time to preview the layout, if you haven't already. This will both check that what you have currently is working and show you why we need to set up the next events. I like to preview as much as possible when working.
When you preview you should see your enemies move. But once they reach one of those walls they will just stop. This is because that boolean never changes. Whatever you set it as they will keep trying to move in that direction . . . forever!
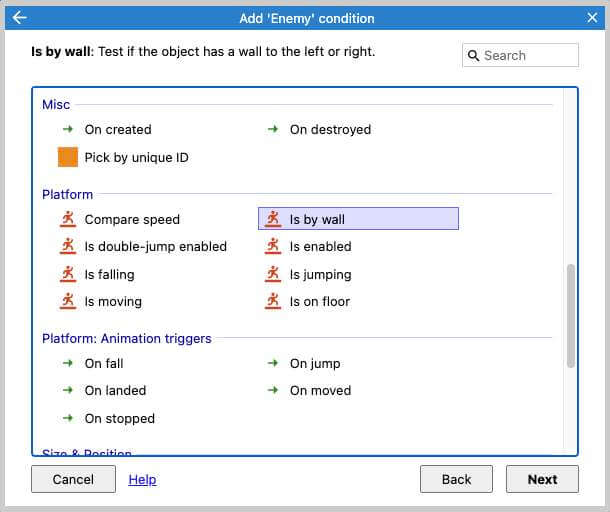
Now we will add another event, choosing the enemy again, and now look for the "is by wall" condition, pictured above.
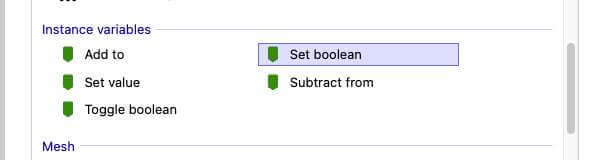
For the action, we will choose "Set Boolean", pictured below.
Now I left out instructions and images on a few prompts during the steps above. That is because I trust that you are learning from the previous events!
But still, I won't leave you hanging! After setting up two events you should have the following:
Now preview your layout and your enemies should constantly be moving!
They should be walking in one direction and whenever they run into a wall they should switch directions.
Now of course they don't do anything fancy right now and don't interact with the player at all - but you should still be proud that you successfully evented your first mechanic!
Step 15: Death
Okay, yeah, I got grim with the title just for fun, ha.
Here we will make two events to account for the player dying, or losing if you want to be less grim.
- Player collides with enemy
- Player falls in a pit
These are pretty typical for platformers. We aren't going to deal with hitpoints or lives or anything to keep this super straightforward. When either of these happen we will consider it a "death".
These are the two conditions you will look for:
- Player collides with enemy
- Player Y value is greater than layout height
When either of these happens we are going to restart the layout. This isn't a great long-term solution but works perfectly as a quick solution for something like this.
The restart layout action is under the system object.
Give it a try for yourself and when done compare what you have to what I came up with below.

A couple of notes. On the first event, it would be fine if you swapped them and it read "Enemy collide with player". On the second, I added a bit of buffer space so when the player drops off the screen there is just a tiny pause before the layout restarts. Personal taste here.
Conclusion and Bonus
I hope you got through all of this and feel good about what you made!
Yeah, you followed a tutorial, but you gotta get started somewhere! This is how everyone gets started and I'm sure you learned something. Progress!
Now I'm sure you probably have a bunch of questions - how to do this or that - or more specifically "I want to add this feature. How can I do that?"
My advice would be one of the two, for what next:
- Find another tutorial for beginners. Don't pick up one for intermediate as there probably be a lot you aren't aware of and set yourself up for struggles and frustration. Another one for beginners may hit on the same topics but you can breeze through those parts and get to something new.
- A lot of people think up a feature - whether new or in some game they have played - and try to figure out how to add it. Doing this is usually a struggle. It is hard to find a tutorial to the thing exactly and what you come up with won't match or turn out what you envisioned. INSTEAD, explore the behaviors, conditions, actions, and settings you see and figure out what you can do with them. For example, explore how the 8 direction movement or physics behaviors work; change the platform behavior settings, such as gravity or angle of gravity (via event); maybe make an event where every 3 seconds the enemies (simulate control) jump and you turn their jump strength really high? The point is there is a lot of stuff you can play around with which will help you learn and you could stumble across something fun and cool.
In the table of contents, the bonus is to create another sprite that acts as the exit door or level complete, like a Mario flag pole. Bascially, to give a goal for the player to make it feel more purposeful like a game. You could have it do different things, like create some text that says congratulations, but the most typical thing would be to go to the next level. To do this you would have to create a new layout, which I don't want to add to this tutorial. But after that is done you would just add the system action of "go to layout".
Note that you could have the new layout share the same event sheet so you don't have to add in the same events. But you could also have it be something completely different, like a racing game! In gamedev, it is your world to create!
Play
After creating this tutorial I decided to add a bit more to it and why not share it here, of course!
This little project has 3 levels and you look for the blue rectangle in each to proceed to the next level. Pretty simple.
Click on the iframe above first - if iframe does not have "focus" the controls weren't register
- Use the arrow keys to play
- Press Tab to toggle fullscreen
Going fullscreen might be necessary on some browsers as the arrows might still scroll the page up and down. After going fullscreen you may have to click to give the iframe "focus".
You can Download the Construct Project here if you want to see how I did anything. Simply open the file in Construct 3.
More Detailed Information
The point of the video is to get people into gamedev in the shortest video possible. I'm someone that likes to dive in right away so I'm not typically a fan of videos where the first 5-10 minutes is simply overviewing everything without actually doing anything.
On the flip side, I don't think it is a good way to learn by following steps blindly without understanding what you are doing.
So on this page, I simply flipped the order of things. So if you are like me, follow the steps above to jump right in and then find out some more details below on various aspects you already dabbled in!
Also, you could use the below simply for reference. As in not reading it until you get confused or are troubleshooting something and need more understanding.
Layout Page and Event Page
When starting a blank project in Construct you should start with one event page and one layout page. You will be working on the layout page until you reach step 14 above.
The layout page is basically a visual editor where you can add objects and design the level visually.
The event page is where you can set up events and actions, which essentially take the place of scripting or programming in Construct. It might take some getting familiar with but it is pretty simple conceptually: IF this happens (condition) THEN do this (action). The "condition" and "action" make up an "event".
If you program you will recognize that it has the same flow of logic. You can add scripts to the project and code in JavaScript, but we will not touch on that here.
Note that the events run every "tick". This basically means it continually repeats itself as quickly as possible. If your framerate is 60 fps then the event sheet runs 60 times in one second. Just throwing that out there for beginners so that if, for example, you only want to do something one time you would put a "on layout start" as the condition . . . or else it will run infinitely.
Creating New Object Types
For now, just think that everything is classified as an "object". Some are visible - such as sprite, tiled background, tilemap, particles - and others are not - mouse input, keyboard input, audio, data types (JSON, array, XML, dictionary).
The easiest way to add an object is to simply double-click any blank area on the layout. This will bring up the pop-up to create a new object.
Everything you will be working with here is a sprite. If you aren't familiar a sprite is basically an animate-able object so could be used for the player, enemies, a tree, projectiles, decorative things that don't do anything - it is usually the "building blocks" of a project, so to speak.
An important clarifying note for beginners: When you create an enemy, for example, you add a sprite to the project for the first one. If you want two of that enemy you don't add a new object/sprite. You create another "instance" of the enemy "object". If you created a new sprite for each enemy you would have to set each of them up every time, such as adding the behavior, events, animations, etc.
Adding Behaviors
Behaviors are basically built-in functionality you can add to sprites (and some other objects).
They don't always do exactly what you want or handle everything you need but they are a great place to start or a great asset to quickly making a prototype. If they don't do exactly what you need you can check the settings on the behaviors or add events in the event sheet.
To add a behavior you select the object you want and click "Behaviors" on the properties bar (on the left by default).
After adding a behavior you will see on that same properties bar some additional settings added for that behavior. The settings are different for different behaviors (and I guess some behaviors don't have additional settings).
Adding a behavior will also make new conditions and actions available in the event sheet. For example, adding the platform behavior will make many actions available, such as controlling/moving it ("simulate control"), adjusting speed, adjusting gravity, and much more. It will also make available different conditions to check, such as checking if it is moving, falling, on the ground, or by a wall.
Comments?
Below are links to where this post is shared on each social media
Instead of a comment section on the blog, I invite you to bring the comments to your social media of choice!